
The Flemish Technique was used by the Old Masters, and it is an approach to build up color in layers. This gives the painting great depth and helps achieve a very high degree of realism. A long time back there was a Virtual class on how to use this technique, in the Acrylics forum of WetCanvas. I could not participate then, but I thought this could be a good time to try my hand at something new, so I am giving it a shot. It is very different from how I work. I do a very rough underpainting, nothing detailed. Here that will change.
The technique is a 7 step process. They are :
- Drawing - transfering the sketch to the canvas. I directly sketch on the canvas freehand. Traditionally though, a detailed drawing is to be done on another paper and is to be transfered to the canvas.
- Toning the canvas - This step is called "Imprimatura", where the canvas is painted with a mid tone color. This is done so that the values can be marked better than painting on a plain white surface.
- Marking the shadows - The shadows are marked using a dark pigment, like Burnt umber. Opaque highlights are then added. So this step becomes a two value process, where only the darkest and lightest values are marked. The painting will begin to emerge reasonably three dimensional in this step itself.
- Dead layer - This layer, also called Penumbra, is painting the entire painting in black and white. It is a very detailed underpainting to mark all the values, so that the coloring part becomes much simpler. The values are clearly separated from the colors.
- Color glazes - After painting everything in black and white, colors are added in glazes. This forms the steps 5 and 6 of the technique.
- One more layer of Color
- Final highlights - Some highlights are added in the end. While painting the dead layer, pure white is not really used. It is reserved to add in the final step.


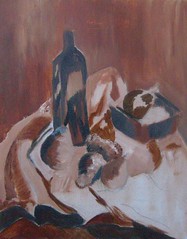
The pictures from left to right depict the steps 1 to 3 in my first painting. I have done the sketching very roughly, washed it with a very watery burnt sienna. Then using a combination of burnt sienna and black, I have added the shadows. In the next step, I have completed the dead layer. The dead layer could be done even more detailed, but I have stopped it here and I will begin to add color next.

It was completely new to me, to refer to a greyscale of my image and do it completely in black and white. I enjoyed it, though it was quite time consuming. I hope it will not be as time consuming if I get used to the technique.
I would recommend visiting the blog of Mark Woodland, who does amazingly realistic works using this approach. The virtual classroom was conducted by him and that's what inspired me to try this. I will fetch the link to that thread and update this post later.
0 comments:
Post a Comment